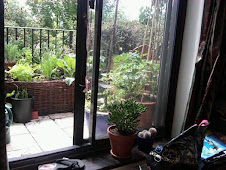
The snow that was piled high on the jumble of the Balcony Farm at Christmas has only just cleared, and looking out from the living room I can see just what a mess it's all become.
So it seemed like a good time to reflect on what has happened since this much neglected blog, and my slightly less neglected Balcony Farm began last Spring.
First, the worms are still alive! Having been rescued at the beginning of December when a layer of frost was beginning to form on the top and around the edges, now the wormery is back on the balcony wrapped in insulation and covered in plastic. I've just had a peek under the lid and some fat, kingly Eisenia Feitida were wriggling just under the surface of the bedding. The insulation is keeping my little guys, if not tropical, then at least at room temperature. However, and it's a big however, with the insulation around the sides and on top, my wormery has pretty much doubled in size and become a big, plastic-covered silver Space Turd that I'll be living with until Spring. But I've successfully migrated the little guys from one section to another (this happened back in September) and just emptied about ten litres of vermicompost from the side I started feeding in May so I feel like my basic design concept and execution has proved workable.
Second - work surface and storage! What a pain! Of course when you think of making your balcony into a garden, what you focus on is the garden - nice stuff to eat and look at. So what do you do when you want to mix potting compost, pot out, store bags of vermiculite, vermicompost, used soil in plastic bags and pots? I don't know. That's why I'm asking. Having soil covered kitchen counters a couple times a week just isn't nice.
Just outside the balcony doors we have a stack of three IKEA recycling bins. Two are for recycling glass, cans and plastic; one is for garden waste and other compostable material I don't want to feed straight to the worms. The stack comes to just above waist height, which - when cleared of broken crockery and detritus - has proved a small but workable surface for potting out seedlings and mixing compost. Next to the stacked bins is one of those plastic greenhouses that are about six feet hight and eighteen inches deep the garden centre sells desperate people. At the moment the bottom is occupied by my failed sweet potato experiment that I haven't cleared out yet, and the other shelves are piled with empty pots, Tomato Feed containers and feather light Vermiculite bags. Functional but not attractive.
And that is really the basic point here. On a balcony, or a patio you just don't have the latitude for anything that looks cluttered, or out of place, or ugly. You don't have the space for it not to stand out like a bag of hammers in a beauty contest.
So that comes next - solving the problem of aesthetics posed by the need for work area and adequate storage. And the Space Turd. After that, immediately after that because it's already mid-January, planning the transition from Balcony Farm to Edible Heritage Herb Balcony. I enjoyed my Toy Town crops of carrots and potatoes, and my unexpected masses of tomatoes. But I'm an allotment gardener now; so no pressure to grow everything on the balcony. More pressure to create an outstanding, beautiful and edible small space.
Saturday, 8 January 2011
Sunday, 11 July 2010
My Sweet Potato Experiment
My wife loves sweet potatoes. I mean the dark orange variety of ipomoea batatas Americans refer to as yams. And of course they’re an important part of our Thanksgiving Dinner, even if we’re having it in Buckinghamshire, just outside London.
We had a few sweet potatoes we bought from Waitrose in our fruit and vegetable bowl long enough to develop tiny purple sprouts, which gave me the idea of growing my own. Online advice was to allow the tuber to “chit” until those little purple sprouts were an inch long. So I waited – and waited. What you’re hoping for are splits, the purple, leafy part with roots attached which are then planted out.
After weeks I had one leafy chit about half an inch long and looked for more online advice which suggested I suspend the tubers directly in water using toothpicks – the way you did when you tried to grow an avocado plant when you were eight. The results were spectacular and immediate. After a week with the tubers in water, I’ve just twisted off my first split, and also cut a little chunk of sweet potato with a tiny leaf and root system from another one and planted both up. When they’ve come on a bit and I’ve got more splits potted I plan to plant them in a grow bag at the bottom of my two foot deep “greenhouse”. Fingers crossed.
I got online information from –
http://blog.gardening-tools-direct.co.uk/2010/02/growing-sweet-potatoes-in-england.html
http://www.downsizer.net/Projects/Growing_food/Growing_Sweet_Potatoes/
http://www.rhs.org.uk/Gardening/Grow-Your-Own/Veg-A-to-Z/Sweet-potato
Sunday, 4 July 2010
Trouble in Wormland
I had been meaning to get some aeration holes retrofitted to the wormery for weeks, and by the time I finally got around to it last week I had troubles, big troubles. Mites, ants and fruit flys were using my wormery as party central and my worm population seemed to be declining. My handy moisture meter told me the bottom of the wormery was saturated and the thermometer said the middle of the bed was 28 C, so the upper limit of what they can stand. I could just imagine my worms, battling parasitic mites and carnivourous grubs fleeing the top layers of bedding only to be cooked in the middle or drowned at the bottom. Not good.
As the wormery is compartmentalised I was most concerned about the section that has the worms, and is almost full. I drilled two sets of hole in the top and bottom. I tried using a 2 cm bit to create a reverse cloverleaf pattern as this is supposed to be an excercise in aesthetics as well, creating two holes at the top for each compartment and two holes at the bottom. Boy, did it smell when the drill poked through those bottom holes and a I got a nice rush of black, reeking slime.
To keep the nastys out I covered the holes with a plastic insect mesh, probably 2mm. I bought a meter of the stuff online and it will last forever, fulfilling all my insect mesh needs. I could fit it on the inside for the top holes (see photo) but had to slap it on the outside for the bottom holes. Not attractive or ideal, but I'm going to apply all this learning to Marque Two.
Now I just had to deal with the mites, ants and flys. We collect plastic takeaway containers so I had enough on hand to fashion four ant traps using ant powder, sugar and kibble and punching holes along the bottom edge and laying them on top of the bedding or burying them around where the ants were congregating. I also dug out the corner where they were swarming and poured a kettle of boiling water over the buggers. I dug around but could never find a queen. For the mites I lay a sheet of newspaper along the top of the now much disturbed bedding, and will take it up, dispose of it and replace it regularly. According to The Worm Book (Nancarrow and Taylor) mites are supposed to congregate on the underside. The Ant Death Trap their idea as well. And the fly trap. Again I used a takeaway container, filled it halfway with cider vinegar, put in a couple drops of washing up liquid, made an opening in the top and laid it carefully on top of the bedding.
So now when I lift the lid of my wormery I looks something like this. That was all yesterday, so too early to tell whether the attempt at aeration or pest control has worked. I'll keep you posted.
Wednesday, 9 June 2010
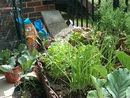
My Balcony Farm
My Balcony Farm is contained within my three by two meter first floor balcony just outside London. To be honest I'm pretty new to this - I mean both blogging and raising vegetables on my balcony. Oh, and keeping a wormery. That's why it's not just a garden. It's a farm.
So "My Balcony Farm" is going to be about mistakes and experiments. Take the wormery that I designed and built back in March out of shiplapped floor boards and two by two. It's supposed to look like an aesthetically pleasing medieval Japanese pickle barrel. It's not supposed to look like the ugly green plastic bins that are available online, just because - well if all you've got is six square meters you don' have room for anything that's ugly. I'm just not sure yet whether it will be adequate to keep the little guys alive and chomping through my melon rinds and egg cartons. Early days.
More to come - about spuds in burlap bags, the pointlessness of naming your worms Betty and Barney and red cabbage in pots. And how many diseases I've spotted so far on my tomatoes
Subscribe to:
Posts (Atom)